Building and Deploying in Eclipse
- bcarlsen (Unlicensed)
Overview
Documents setting up code, config, and data in a development environment using Eclipse.
Prerequisites - Prerequisites and Software Dependencies
- Git client
- Java 8 installed
- MySQL 5.6 installed (do not use a later version)
- See link for settings to optimize MySQL
- Make sure to install the MySQL Workbench
- Maven 3.3.+ installed (download and unpack into e.g. c:/apache-maven-3.3.9/)
- Tomcat 8+ installed and configured (download and unpack into e.g. c:/apache-tomcat-8.0.36)
- Eclipse - Use version 4.* (Neon) - J2EE edition
- See Eclipse Setup
Details
Step 1 - Create directories
Setup for Windows
- Create a directory to hold your data files (e.g. c:/umlsserver/data)
- Create a directory to hold your config files (e.g. c:/umlsserver/config)
- Create a directory to hold the code (e.g. c:/workspace)
- Create a directory to hold scripts (e.g. c:/umlsserver/bin)
- Make sure the "mvn" executable for your local maven installation is in the path
- On Windows this means adding to the PATH variable so that it runs in a "cmd" shell without fully qualified path.
Setup for Unix/Linux/Mac
- Create a directory to hold your data files (e.g. ~/data)
- Create a directory to hold your config files (e.g. ~/config)
- Create a directory to hold the code (e.g. ~/code)
- Create a directory to hold scripts (e.g. ~/bin)
- Make sure the "mvn" executable for your local maven installation is in the path
Step 2 - Clone repository
Clone the Github repository to the directory created to hold the code.
- NOTE: on windows, we recommend using https://tortoisegit.org/download/
- NOTE: for developers, switch to the "develop" branch
Step 3 - Build project
Import the project into Eclipse (e.g. File → Import → Maven → Existing Maven Project)
Build all project modules with "mvn clean install" at the top level - either through Eclipse or via the command line.
- NOTE: this uses the standard "dev-windows" configuration. To use a different configuration artifact pass the following three parameters (this is not commonly needed):
- -Dconfig.groupId=...
- -Dconfig.artifactId=...
- -Dconfig.version=...
- For most dev deployments, the default build is fine because the only setting really used for the rest/webapp packages is the "base.url" which by default is set to http://localhost:8080/umls-server-rest
- For a production deployment, you would want to use a different setting. For example, see Deploy Instructions for the prod deployment instructions.
Step 4 - Setup Configuration
Choose a "dev-windows" or "prod" config project target and unzip it into the directory created to hold your config files.
- config/dev-windows/target/term-server-config-dev-windows.*.zip (e.g. unzip to c:/umlsserver/config)
- config/prod/target/term-server-config-prod.*.zip (e.g. unzip to ~/umlsserver/config)
Unzip the config/target/term-server-config.*.zip file into the directory created to hold your data files (these are the sample data artifacts). For example, unzip to c:/umlsserver/data when building a dev environment on Windows.
OR just copy the appropriate config.properties file to your config directory (e.g. c:/umlsserver/config)
Step 5 - Edit configuration
Edit the "config.properties" file in your config files directory to set correctly for your environment. In particular, edit the ones that say "EDIT_THIS"
- javax.persistence.jdbc.url
- javax.persistence.jdbc.user
- javax.persistence.jdbc.password
- hibernate.search.default.indexBase ( recommend choosing something in your data dir, e.g. c:/umlsserver/data/indexes or ~/umlsserver/indexes)
- mail.smtp.to (list for automated system emails)
Step 5b - acronyms/spelling.txt
The config project has acronyms.txt and spelling.txt files in src/main/resources/data. These files need to be copied to the data directory (e.g. c:/umlsserver/data or ~/umlsserver/data) and the config.properties file needs to be properly updated to point to them from the ATOMCLASS search handler. If you use default settings, it should already be properly configured for Windows.
search.handler.ATOMCLASS.acronymsFile=c:/umlsserver/data/acronyms.txt
search.handler.ATOMCLASS.spellingFile=c:/umlsserver/data/spelling.txt
Step 6 - Create database
Create a MySQL UTF8 database. e.g.
- CREATE database umlsdb2 CHARACTER SET utf8 default collate utf8_bin;
Step 7 - Load data
The easiest way to load data is to run the ResetDevDatabase integration test. It performs a series of mojo calls that load the "stock" development database. You will need several pieces of information
- The system will need to be configured with a JAVA_HOME environment variable pointing to the same JDK your Eclipse is configured with.
- Note, on Windows, this is Control Panel -> System -> Advanced Settings -> Environment Variables
- The location of your config file (e.g. c:/umlsserver/config/config.properties)
- The location where you have Maven installed (e.g. c:/maven-3.2.5).
It can be invoked with a Maven command like this one:
# start in the project root
cd integration-test
mvn install -Preset -Drun.config.umls=c:/umlsserver/config/config.properties -DskipTests=false -Dmaven.home=c:/apache-maven-3.3.9
Alternatively, you can set up an Eclipse run configuration for this. For example,
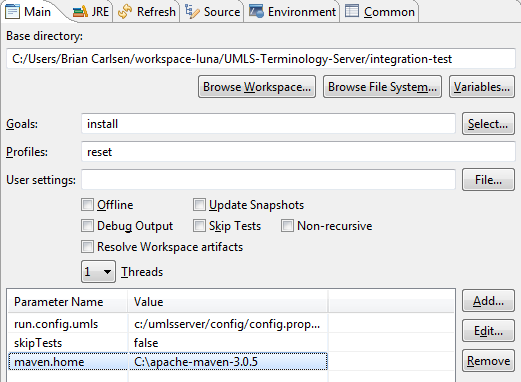
NOTE: if re-running this, consider using the statements in "admin/mojo/src/main/resources/truncate_all.sql" to clear your database of all tables first.
Step 8 - Deploy application, Launch Server
Deploy the umls-server-rest.war file to a Tomcat server - either through Eclipse or a standalone tomcat installation. NOTE: It should also be deployable to a simple Jetty container as an alternative.
Setting up Tomcat in Eclipse is very easy, you follow these steps.
- Download and install apache tomcat 7 (or higher) in c:/apache-tomcat-XXXX
- In Eclipse use the J2EE perspective and click on the "Servers" tab.
- From here, you can add a server which simply involves pointing Eclipse to the install directory for Tomcat.
- You can right-click on term-server-rest.war file and use "Run As->Run on Server" to deploy to Tomcat.
The Tomcat server needs to be able to find the run configuration. Double-click on the Tomcat server you installed, open the launch configuration and add this setting:
-Drun.config.umls=c:/umlsserver/config/config.properties
Setting up Jetty in Eclipse is also very easy. Follow these steps:
- Install the "Jetty Eclipse" plugin from the Eclipse marketplace
- Create a "Jetty Webapp" run configuration
- Choose the "context path" (e.g. /umls-term-server).
In the "Arguments" tab, specify your run.config.umls setting as a VM argument, e.g.:
-Drun.config.umls=c:/umlsserver/config/config.properties
- Launch the run configuration to star the server.
- See screenshots for Jetty/Eclipse configuration
Step 9 - Test application
Check that it all works by going to
http://localhost:8080/umls-server-rest/index.html
This should be a demo app that contains a basic terminology browser and (in the header) a link to a "swagger" Api documenting the service calls available. You should be able to log in to either the application or the Swagger services by authenticating with "guest" username and "guest" password.
NOTE: in the Eclipse dev environment, the swagger API does not load properly because Eclipse m2e is unable to handle the maven plugin executions that handle the interpolation of ${base.url} in the swagger files. Building and deploying the actual umls-server-rest.war file is needed for this to work properly.
Step 10 - Run the Examples
See the examples project for some sample code on using the REST APIs in a variety of different ways. You can run the examples against the standard dev database load through Maven.
cd /path/to/examples/
mvn install -DskipTests=false -Drun.config.umls=/path/to/config.properties
NOTE: the examples require the server to be running, they do not access the database directly.
References/Links
n/a